Sunday, November 25, 2007

KISS vs. KK Gauge

Many of us started to learn to loom knit with the KK looms, so the obvious question is: can KK patterns be knit on KISS looms?

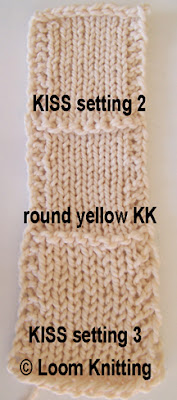
This swatch shows that the KISS looms can handle bulky yarns. The yarn I used was from my stash with no label, but I believe it's Lion Brand Wool-Ease Thick and Quick. I modified the wrap method to use every other peg, and two pins per peg. The top section is done with the KISS loom on Setting 2, the middle section is done on the round yellow KK loom, and the bottom section is done with the KISS loom on Setting 3.

On Setting 2, the gauge is 3"= 6-3/4 stitches and 11 rows.

On the yellow loom, the gauge is 3" = 7 stitches and 11 rows.

On Setting 3, the gauge is 3" = 5-1/2 stitches and 8 rows. (Setting 3 is only possible when knitting flat pieces, not in the round, because of the placement of the bolt holes on the boards.)

Your results may be slightly different, but a close approximation to the yellow KK loom is to use Setting 2, maybe with a spacer or two, and the modified wrap method.

Saturday, November 24, 2007

Extreme KISS

The KISS loom boards are designed for three basic settings, which you choose based on how the boards are placed against each other.
Setting 1 has the thin sides of the peg board and the pin board together. Setting 2 has the thin sides of both boards facing the same direction. Setting 3 has the wide sides of the boards together. (ed. Setting 3 is only possible with the boards in a straight line, not in the round.) Each of the settings moves the pegs and the pins further apart.

The looms come with spacers that are 1/32" of an inch thick which can be placed in between the boards, so you can fine-tune the gauge of your knitting.

This swatch shows the difference between basic setting 2, and adding a single spacer to slightly increase the stitch gauge.


The knitting on the left is at Setting 2, with 4"= 12 stitches and 15 rows. The knitting on the right is at Setting 2 with 1 spacer, and 4" = 11-1/2 stitches and 14 rows.

This swatch shows the other end of the extreme: the difference between basic setting 2, and adding 32 spacers (1" worth, about the maximum extent the bolts allow) to greatly increase the stitch gauge.


The knitting on the left is at Setting 2, with 4"= 12 stitches and 15 rows. The knitting on the right is at Setting 2 with 32 spacers, and 4" = 8 - 9 stitches and about 4 rows.

The nice thing is that I was able to add the spacers to the loom without needing a row of waste knitting or even removing the knitting from the loom. I can see this being very handy when knitting things with borders such as sweaters. Many sweater patterns call for a specific size needle when knitting ribbed edges then switching to a needle one size larger to knit the body and sleeves of the sweater. With these looms, you can knit the ribbed edge, then slip in a spacer or two before knitting the rest of the piece.

Friday, November 23, 2007

First KISS


I've recently had the opportunity to do some experimenting with a new type of knitting loom, the KISS loom. These looms look like double rakes without the gap in the center for the knitting to go through. But, the knitting is done only on the front board with the pegs, and the knitting comes off the loom behind the back board. The back board has pins, which are used only to achieve a specific gauge. So far, I've been able to replicate every basic technique I've done with KK round looms on the KISS looms, with a slight modification to the wrapping method to incorporate using the pins.

The pin board is used to regulate the bar portion of the stitch, or the amount of traveling yarn used between wrapping one peg and the next. It affects the tension of the resulting stitches, which impacts the gauge (number of stitches and number of rows per inch) of the completed knitting.

What is so exciting about these looms is that they can be adjusted to achieve the exact gauge you want! Needle knitters switch needles to get a different gauge. Now, loom knitters can adjust the loom to make the knit gauge larger or smaller. What this means is that no matter how loosely or tightly you knit, you will be able to exactly match the gauge the designer got when creating the pattern you want to make!

The looms are also modular, so you can assemble the pieces according to the number of pegs you want to use, especially handy for making socks and hats and other tube-style projects in different sizes. Customizable stitch size and quantity -- what else could a loomer want?

I'll have more to share about these looms in the future, but for now I'd like to show you three different knit pieces, created on the same loom from the same skein of yarn. The different knitting gauges are achieved simply by adjusting the distance between the peg board and the pin board. These are made with the basic settings, but it is very easy to fine tune the settings to get a knit gauge in between these.

All swatches are worsted weight Red Heart yarn in stockinette (flat knit) stitch.Setting 1: 1 inch = 4-1/2 stitches and 6 rows


Setting 2: 1 inch = 3 stitches and 4 rows


Setting 3: 1 inch = 2-1/2 stitches and 3-1/2 rows

Tuesday, November 20, 2007

No Curls with Purls

I'm frequently asked what can be done about the curling at the ends and sides of flat pieces. An answer I've often seen and heard is to crochet an edge around the piece to make it lay flat. But this common problem is easily handled while the piece is still on the loom (or needles).

First, I think it helps to understand why the curling happens. Each stitch has tension, and the tension pulls in a certain direction. When all your stitches are identical, they all pull in the same direction.

So the answer is to use some stitches that pull in the opposite direction. Purl stitches, being the opposite of knit stitches, pull in the opposite direction of knit stitches.

You don't need equal amounts of purl stitches as knit stitches; a border around your knit piece will work just fine.

This piece is made with two purl stitches on each end of every other row. So one row is Knit All, and the next row is Purl 2, Knit to two stitches before the end, Purl 2. (If you want a pretty edge, add a slip stitch at the beginning of each row by skipping the first peg.) The finishing edge has a row of knit stitches then a row of purl stitches alternating for several rows.

The garter pattern shown here is only one of many possible combinations of knit and purl stitches that can be used to prevent curling. But the key is that you must use some combination of both stitches to make a flat piece lay flat.

Monday, November 19, 2007

Suzie Snowlady Class

I am teaching an online class with the Yahoo group Loom Class next week (starting Nov. 26) for Toni Girt's snowman pattern, with Toni's blessing. I knit one up last week, and it was a real hit on the demo cart at Michaels this week-end. I used pony beads for the embellishments as that's what was easily available at the time. A couple young girls decided it was a girl, because of her pink and purple hat and scarf, and they named her Suzie.

I did deviate a little from Toni's pattern. If you leave a long tail with one of the yarn strands when casting on, you can use it to gather the bottom of the snowman/lady closed. At row 22, I put in a lifeline, which delineated where the neck would be. I used a 4" styrofoam ball (with the plastic wrapper still on it so it wouldn't catch the yarn) for the head, and a 5" ball for the body. I used the lifeline to snug up the neck in between the two balls by pulling it to gather the knitting somewhat, then tying it in a knot. The scarf is a 2-peg I-cord.

To help make the snowman/lady stand, whack the body's styrofoam ball hard on a flat surface to create a flat section on the ball. Or, don't gather the bottom of the body, and let the curled cast-on edge be a base of snow that helps support the body to stand upright.

This is an easy, simple, fun project suitable even for beginners that will add some festivity during the holidays and winter season.

Saturday, November 17, 2007

Long Loom Purse #2

I incorporated the changes I mentioned with the long loom purse demonstration project for the Michaels Yarn Event on Sunday, and finished the purse at the Class Preview today. I used a lucet cast on, and a single knit bind off, which made for equal stretch for the top edges. For the seam up the sides, I did crochet slip stitches on the right side of the purse. The "crochet braid" blended right in with the knit pattern and looks much nicer. I crocheted extra single stitches for the loop closure, so the button could be lower on the body of the purse. And I strung a package of matching beads on the yarn for a beaded handle, which I like MUCH better than the bulky 4-peg I-cord. I didn't put a lining in it, but if I were to use the purse, I definitely would, so the contents wouldn't stretch the purse out of shape.

Tuesday, November 06, 2007

Felted Muff Pattern


This felted muff is another great project for gift giving. I wish I had one of these when I was a soccer mom, freezing on the sidelines early on Saturday mornings while my daughter and her teammates were running up and down the field keeping warm.

These muffs are as practical as they are pretty. The layers of fur and felted wool will keep your hands warm, and give extra warmth if you're already wearing mittens or gloves. The neck strap will keep the muff from falling to the ground as you wave your arms cheering. And there's even a little pocket attached that fits inside the muff where you can tuck a tissue or the car key.

The pattern has been added to the website.

Oh, do be sure to watch the felting while it happens, or your muff will become a great sleeping tube for a mouse!

Saturday, November 03, 2007

Long Loom Purse

Michaels is having a Yarn Event on November 11 and 17 in all their stores. All the KK instructors will be doing demonstrations on the long loom set, making this purse. This isn't my pattern, but I did knit up a sample to put on display at the store where I teach.

This purse is knit with just over 1/2 skein Lion Brand Wool-Ease Thick and Quick using all the pegs on the pink loom, using a "Figure-8" stitch for 36 rows. The knit rectangle is folded in half, and side seams are sewn. The purse opening has one row of single crochet, with a loop included in the middle of one side for the closure. I used a large bead to complete the closure. The strap is a 4-peg I-cord also made on the pink loom.

If I were to make this purse for myself, I would make a shorter, beaded strap, as the 6" square purse is too pretty and dainty for the bulky I-cord strap. I would also put a lining in it so heavy contents don't stretch the knitting out of shape.

Thursday, November 01, 2007

Felted Slippers Pattern finally here!

I've had so much fun creating this pattern, and I can't even begin to count how many pairs of slippers I've knit already -- I've got a great start on my Christmas list! The pattern has been many months in the design, but well worth the wait because the slippers are super comfortable!


The slippers are knit as flat pieces on the round green or yellow KK loom, with seams on the top of the foot and at the heel.


After felting, they are custom shaped to the foot of the wearer for a perfect fit.


This pattern includes sizes from a youth large (women's size 3) up to a men's size 13. I hope you enjoy making these and giving them as gifts as much as I have enjoyed creating the pattern.